We know that people learn material effectively in many ways, and that learning physical movements by reading descriptions like we have on this page isn’t an easy method for everyone. We’ve done our best to be as explicit and thorough as possible, in hopes that many of you will be able to learn this material here. However, we remind even those who find it simple to follow print directions of physical skills that strikes are going to be best learned through repetitive physical training with a good teacher. If you have access to good martial-arts classes in your area (e.g. Brazilian jiu-jitsu, aikido, boxing, karate, or whichever of the hundreds of other martial arts practices appeal best to you, and in which you can find local teachers that you like), do check them out and learn what you can from those in-person teachers. We’d strongly advise getting some in-person training before you try to teach strikes to others.
That said, we think that much of the information on this page should be useful to folks with many different experience levels and learning styles. We cover the basic striking fundamentals, describe the techniques that work well for us in teaching and practicing strikes within a one-session self defense class (a different context than many martial arts classes, which count on participants to return for months or years), and present detailed descriptions of the specific strikes that we find easiest for folks to be able learn and use well for self defense without years of practice.
STRIKING FUNDAMENTALS
Striking surface: the surface of your body that will make contact with the target (e.g. the palm of your hand for a palm strike).
Target: the part of the other person’s body that you’re aiming for (e.g. their nose, collarbone, etc.)
Striking distance: how close you are to the target. You must be closer than you think in order to make a solid impact!
Fighting stance: All of our physical skills start and finish in fighting stance, readying you either for your next physical move or for evaluating the situation and then quickly getting out of there.
Striking through the target: To maximize your impact with strikes, you must send your force not just to the target of your strike (e.g. the nose, collarbone, groin, etc.), but through to a good distance on the other side of it: if aiming for the nose, send your impact all the way through to the back of the head. Standing close enough in order to strike through the target is one of the most common reminders we need to give participants as they practice hitting our pads; their blows get more powerful once they start doing this.
Using your core: Keeping your core (gut) muscles engaged will direct your action and give your striking upper or lower body the power it needs; this engagement will also help you to snap your body back into fighting stance like a rubber band after you strike through the target.
Where striking force comes from: The power of every strike comes from the momentum, leverage, and weight of your entire body that you send through your striking surface, not just from the striking arm or leg itself.
Remember to use your voice: Yelling or grunting as you strike, it’s all good. If you’re extremely uncomfortable using your voice, at least exhale powerfully as you strike; however, we try to encourage everyone to take advantage of the structured and supportive opportunity of class time to practice being as loud as they can. We find that the power of participants’ strikes increases dramatically once they start using their voice!
General motion for upper-body strikes:
Stand in your fighting stance, with your striking arm closer to your body, and your foot that’s on the striking side of your body slightly further back than the other foot (remember that your feet should always be staggered for better balance in fighting stance). Using your core, send your arm forward into a strike, with the upper body staying upright and moving as one and the hips and shoulders in the same plane. Yell as you strike! You can improve your use of full-body momentum and leverage by slightly pivoting on the ball of your back foot (as though extinguishing a cigarette or squishing a bug) in conjunction with twisting your torso/hips/shoulders from the thigh as the arm strikes forward. After striking through your target, rebound back to fighting stance.
HOW TO TEACH AND PRACTICE STRIKES IN CLASS
As you teach and coach the practicing of strikes, be aware of and openly acknowledge the wide range of physical abilities that may be present in the class. Invite folks to sit out or check in with you if they have a concern about whether or not they should practice a technique, respect their decisions and boundaries around this, and be present and aware of how people are doing as they are practicing. Don’t assume that everyone in the room is physically able to practice every technique, and avoid saying things like “This is easy” or “Anyone can do this.” Instead, you can say things such as “We encourage everyone who is able to. . .” and strive to mention alternatives when you can (for example, “Or you could be sitting down in fighting stance to do this strike.”). Self-defense techniques can be adjusted according to what feels the most comfortable and powerful for each person. If a participant is not able to do a particular strike due to physical limitations, work with that person to identify which other techniques work and feel powerful for them. This is at the core of our “What’s Free/What’s Open” model – if one technique doesn’t work for you, try something else!
As you teach individual strikes, verbally and physically demonstrate the skill. Be as descriptive as possible and avoid vague language like “do it like this” in conjunction with a physical demonstration. Instead, describe exactly what it is you are doing. For example, we might say: “make a fist by curling your fingers into your palm with your thumb on top.”
Be encouraging. Many participants in our classes aren’t used to either striking or yelling!
Watch participants closely, and offer constructive feedback. It’s your job as instructor to make sure that folks are staying safe, and also to help them to use their bodies as powerfully as possible. You’ll have to feel out how much individualized suggestions are welcomed by your class and by individual participants, or if the suggestions seem to diminish their confidence, and choose between offering suggestions to the whole group (“OK, remember to spring back to fighting stance like you’re a rubber band,” or “keep your shoulders and hips parallel”), or to call them out to individuals (“Eli, move the foot on your striking side further back”). It often helps to tell them in advance of practice that you’ll be offering them feedback on their strikes.
Use practice pads if possible. Using practice pads is important so that our bodies can feel what it’s like to give and receive a blow. You can choose whether it makes more sense for your group if the instructors hold the pads for all to practice, or if participants will pair off and hold the pads for each other while they practice. Consider that whoever ends up holding the pads will absorb shock from taking the blows – they’ll need to use good form, and do some self-care / stretching / water-drinking afterwards; they’re also taking some risk of being hit by an off-target blow. You also may be limited by the numbers of pads you have available, or by class time (if the class isn’t tremendously large, it may actually be faster for instructors to absorb all the blows, as you won’t have to teach them how to hold the pads).
We generally follow this sequence for teaching upper-body strikes:
- Describe and demonstrate the general motion for upper-body strikes (see above)
- Have participants practice in the air to get the hang of the general striking motion and these main striking concepts: using their core, sending power from their whole body into their striking side, and starting in and rebounding to fighting stance. We tell them to put their arms behind their backs and practice the striking motion without actually sending their arm out. We do this practice along with them, while simultaneously watching them and offering the group tips and reminders. Once they can feel how the power of the strike comes from their whole body (rather than from their arms alone), we have them add their striking arm to the motion. We allow the participants to practice in the air on their own for a few moments, while watching and offering feedback, then tell them that we’ll all be practicing the strike 10 times in the air, and remind them to yell and use their voice when practicing strikes. We strike in the air as they do, watching their dynamics and offer suggestions / reminders as necessary, and lead the group by calling out, “one! two! three!” etc. (they should be yelling with us!), striking each time you call out. After “ten,” we ask participants to switch to use the other side of their body as the striking side, and remind them that this may be the less-dominant side of their body and may feel awkward or uncomfortable. After they practice on their own in the air for a moment, we repeat the counting-to-ten group striking drill on this second side.
- Introduce a practice pad. If we’re going to pair participants and have some of them hold pads while others strike at them, we demonstrate with another instructor how to hold the pad; in any case, we demonstrate how to strike the pad. (See “How to hold a practice pad” and “How to strike a practice pad” below.)
- Have participants practice the strikes on the pad. Either have participants do this in pairs with instructors watching carefully and circling the room and offering feedback, or have participants form lines in front of either instructor and each take a turn at the pad. Before they begin, remind the strikers to check in and/or make eye contact with the pad-holder before striking, and remind them that you’ll be giving them feedback as they strike. We generally have them practice five full-force strikes on the pad with each side of their body. If they’re in lines in front of the instructors, we amp up the adrenaline by asking (and reminding!) the others to cheer for the strikers, and perhaps by yelling along with them ourselves. You can ask them to pause for a minute to offer them feedback, or tell it to them as they strike (“come closer!” “yell!” “that’s right! you’re doing great!”). The most common feedback that we find needed is to step in closer and strike through the target, and also to yell while striking; you may want to allow them several more practice strikes after this feedback, so that they can feel the difference in their bodies.
How much time to plan into your curriculum for teaching strikes? This varies based on how many strikes you’re teaching, what your class size is, if you’re using pads vs just practicing in the air, etc. In an average class of 20 people, with two instructors and two pads to practice on, we’d generally leave about 20 minutes to cover one strike. Additional strikes should get quicker to teach, as the class will be more familiar with the striking fundamentals starting off. And if you don’t have pads and are only practicing them in the air, it should take about half the time to cover striking fundamentals and dynamics of one strike.
USING PADS
How to hold a practice pad:
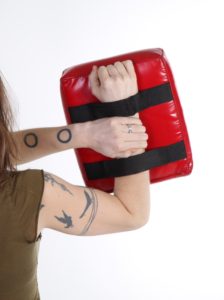
- Position your body in ready/fighting stance.
- For small pads, place your forearm through the straps of the pad and brace that wrist with your other hand. For larger pads, place your forearm through the straps of the pad and brace with your entire body.
- If you’re modeling a target on the face or head, position the pad to the side of your head, not directly in front of it. For larger pads (generally used for practicing knee-to-the-groin and other lower-body strikes), position the pad between your legs or along the side of your body; bend your knees and lower your center of gravity to be nearer to the pad.
- When receiving a blow to the pad, breathe out or yell with the striker. Don’t overly resist – giving in to some of the strike as you exhale will make the impact much easier on your body.
- Do self-care afterwards – we often find that it helps to drink some water and do some wrist or upper-body stretches right away; after a class where you’ve absorbed a lot of strikes, you may appreciate a hot bath, some arnica cream, and extra sleep.
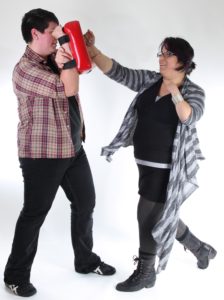
How to strike a practice pad:
- Start by standing close enough to the pad/target so that you’re going to be able to keep an upright posture while striking fully through the target, without leaning in or over-extending your joints.
- Make sure that the person holding the pad is ready before beginning to strike by verbally checking in and/or through eye contact.
- Begin by practicing the strike in slow-motion and gently tapping the pad. (If you notice the participant is over-extending their body to reach the pad, remind them to step in closer during this time.)
- Strike the pad full-force several times with each side of your body, yelling or exhaling forcefully with each strike.
SPECIFIC STRIKES
PALM STRIKE


Specific mechanics: The striking surface is the base of the palm of your hand. The wrist is bent back to expose the palm, and the fingers and thumb are together (not splayed out). Some people choose to curl the tops of their fingers down towards their palm – if this is comfortable for you, go for it. Start in your fighting stance, with your striking arm closer to your body, and your foot that’s on the striking side of your body slightly further back than the other foot. Using your core, send the power of your body into your palm as it strikes forward (and often up, depending on the height of your target), with the upper body staying upright and moving as one and the hips and shoulders in the same plane. Yell as you strike! You can improve your use of full-body momentum and leverage by slightly pivoting on the ball of your back foot (as though extinguishing a cigarette or squishing a bug) in conjunction with twisting your torso/hips/shoulders from the thigh as the arm strikes forward. After striking through your target, rebound back to fighting stance.
Common targets / use: A palm strike is generally used for a target directly in front of you, e.g. a nose.
HAMMER FIST
Specific mechanics: Make a fist by curling your fingers into your palm with your thumb on the outside. To reduce injury, the thumb always goes on top, not inside, of your fingers. The striking surface is the padded edge of your hand between your pinky finger and your wrist. (This is different from a straight punch, where the striking surface is the knuckle-side of your fist.)
Start in your fighting stance, with your striking arm closer to your body, and your foot that’s on the striking side of your body slightly further back than the other foot. Using your core, send the power of your body into the soft side of your fist as it strikes (this can be used in many directions! see target info below), with the upper body staying upright and moving as one and the hips and shoulders in the same plane. Yell as you strike! You can improve your use of full-body momentum and leverage by slightly pivoting on the ball of your back foot (as though extinguishing a cigarette or squishing a bug) in conjunction with twisting your torso/hips/shoulders from the thigh as the arm strikes forward. After striking through your target, rebound back to fighting stance.
Common targets / use: The hammer fist is versatile and can be swung in any direction you can swing a hammer. We often model it at a nose, side of the head, or collarbone if you’re in an upright position. If you’re bent over, it sometimes can work well to access the groin or ribs with this strike.
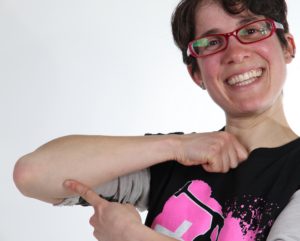
Practice notes: Encourage participants to make a fist and practice gently tapping a hard surface (the floor, a wall, or a counter-top) first with their knuckles and then with the pad of their fist. Ask which striking surface they are able to use longer and harder. We teach hammer fists instead of straight punches because they can be done well with less training, and because they’re less likely to injure the striker in the process.
ELBOW STRIKE


Specific mechanics: Start in your fighting stance, with your foot that’s on the striking side of your body slightly further back than the other foot. Fully extend your arm and then fold it at the elbow so that your hand is held in toward your chest. (For some striking directions, you may choose to fold it toward your shoulder.) You can keep your hand curled up in a fist or flat with your fingers together. Keep your shoulders rolled back. The striking surface of the elbow strike is not the pointy part of your elbow; rather, it is the two-inch surface directly above or below your elbow.
Using your core, send the power of your body into your elbow as it strikes (this can be used in many directions! see target info below), with the upper body moving as one and the hips and shoulders in the same plane. Yell as you strike! You can improve your use of full-body momentum and leverage by slightly pivoting on the ball of your back foot (as though extinguishing a cigarette or squishing a bug) in conjunction with twisting your torso/hips/shoulders from the thigh as the arm strikes forward. After striking through your target, rebound back to fighting stance.
Common targets / use: The elbow strike is versatile: the target can be in front of you, to the side of you, or behind you. You can strike sideways at the side of someone’s head, you can strike from below at the underside of their chin, you can strike from above at their collarbone, you can strike down at the ribs of someone behind you, etc. – the choice of target will vary based on the relative positions and heights of the striker and the person being struck.
Practice notes: A common challenge with this strike is how extremely close you need to be to your target in order to have your full force reach the target without leaning in. Encourage participants to come closer and push through that discomfort. The elbow strike carries a tremendous amount of power by using the strength of your shoulder girdle, reinforced by your hand, in a closer and more controlled range. If you’re striking somewhere on the head, you may want to grab the back of the head with your free hand and pull it in towards your elbow as you strike. When striking a practice pad in this manner, grasp the hand of the pad-holder behind the pad.
BIRD BEAKS


Specific mechanics: Bring the tips of your fingers on each hand together (thumb included), so that your fingers are pointed like the points of two bird beaks. The striking surface is the collective tip of fingers on each hand. This striking surface is larger than the striking surface of an individual finger, allowing your strike to be more successful and less injurious to your own body (by snagging or jamming a loose finger). Move the forearms from your elbows (not from the shoulders),or move the hands from the wrists, in a quick pecking (back and forth) motion.
Common targets / use: Eyes are a good target for bird beaks. You can hit either on top of glasses, peck under them, or grab and throw glasses aside.
Practice notes: This strike can be practiced on a pad or in the air, usually as we teach primary targets.
FOREARM SHIVER

Specific mechanics: Make a fist with your hand. The striking surface is the entire blade of your forearm between the thumb side of your wrist and the crook of your elbow. Start in your fighting stance, with your foot that’s on the striking side of your body further back than the other foot. You may need to bend lower at your knee and have your legs spaced farther than usual when in fighting stance. In a gesture similar to rolling a bowling ball or spiking a volleyball, swing your arm back, then under and up into the groin area. Spring back to an upright fighting stance.
Common targets / use: The target of the forearm shiver is usually the groin – not the front of the groin in-between the hips, but rather the underneath area in between their legs.
Practice notes: This one we just practice in the air, usually as we teach primary targets [link]. Instructors can demo with one standing spread-legged and another swinging up towards the groin but without making real contact. Mention that strikes to the groin are effective regardless of sex/gender/groin style. This strike can be especially useful on someone much taller, or from the ground or a seated position on someone who is above you.
KNEE-TO-GROIN


Specific mechanics: The striking surface is the two-inch surface directly above your knee. In your fighting stance, stand close enough to your target so that you can grab their shoulders to stabilize yourself: either one hand on each shoulder, or both hands on one shoulder. Pivot your body, bringing your back knee forward in between the target’s legs and up into their groin while you pull their upper body down and towards you to increase the strength of your strike. Yell as you strike! Rebound back to fighting stance.
Common targets / use: When striking the groin, the target is not the front of the groin in between their hips, but rather the underneath area in between their legs.
Practice notes: Mention that strikes to the groin are effective no matter what regardless of sex/gender/groin style. This strike can be practiced on large pads, or just in the air if no large pads are available. One fun way for the group to practice this together in the air is the Zombie Walk: have everyone stand in a circle, then all turn to face the back of the head of the person next to them. Then everyone holds their arms up and imagines that they are holding onto someone’s shoulders. (This body posturing is where the “zombie” name comes from.) All bring one knee up high, practically in-between their arms, while leaning their upper body backwards and imagining that they are striking the groin of the imaginary person whose shoulders they are pulling in. That knee comes down and the next knee follows, so that the group walks together in a circle, practicing the Knee-to-Groin strike as zombies.
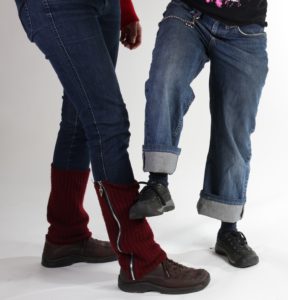
SHIN FLICK


Specific mechanics: The striking surface for the shin flick is the ball of the foot. In your fighting stance, keep your hips and torso facing forward and upright – maintaining your balance is very important. Raise your knee slightly and snap your foot forward, hinged from the knee, to strike through the shin. Rebound back to fighting stance.
Another variation is the “shin flick and foot stomp” combo, in which the striking surface is the outer side of the foot’s arch: in this strike, you are in front of your target person and facing to the side. Raise your knee slightly, snap the foot to the side to hit the shin, then slide it down their shin to stomp down onto the foot. Then rebound.